Monday, January 31, 2011

REMOTE HACKING


A Major Notice If you are behind a router you will need to port forward your router. To do this you can use a DMS. Its hard to explain as every router has a different interface ( homepage that has a different layout ) so i suggest you go to google and search portforward.com. It will teach you how to port forward your router there.

Ok to begin with you will need these three tools

Code:
Daemon Crypt - http://rapidshare.com/files/8161346/Daemon_Crypt.rar
Pc Guard - http://rapidshare.com/files/11136172/PC_GUard.rar
Yuri Rat - http://rapidshare.com/files/8161510/Yuri_Rat.rar
Ok now that you have these three tools your 1st step will be to open up Yuri Rat and then click on server build


Click this bar to view the small image.
in this screen I want you to put your IP address into the DNS/IP section.

To get IP Address go to Start > Run > Type CMD and hit enter. When the black box appears type in IPCONFIG. You will then have your IP Address

Port: You Can Leave As Default (-789

Assigned Name: Doesn?t effect how the server will work its just to keep you more organized so if you wanted to hack your friend ?JOE? and specifically make this server for him then you may want to type something like ?JOES TROJAN?.

Server Install Name: You should leave this as default as I myself don?t know what the difference is as every server you make is named server when it is 1st created anyway. Do not change it as it may make problems but I am not sure.

Ok as you can see there are more settings on the right hand side. I am going to recommend you settings for different purposes

To Hack A Friend For Fun: Uncheck Everything Unless You Want To Do Optional
(OPTIONAL) Melt Server - Your server will disappear into another folder
(OPTIONAL) Custom Icon if you want to make it more believable or something then get an icon of super Mario or something you get my drift

To Find Out Valuable Information: Check Everything

Ok Now You Are Finished Click Build

Your server will then be saved to your C:\ or Hard Drive which ever you know it as. Now we are going to make the server about 90% Undetectable. Only once has one of my servers been detected by an anti virus and I think it was a Norton not sure which version. Ive scanned more then once with Kasper Sky & Symantec Anti Virus and every time they said its clean so lets begin

Open Up Daemon Crypt

Select Your File by clicking browse and going to the folder your server is in. If you have not moved it, it will most likely be in C:\

So Now You Have This
Click On Crypt and then you can close Daemon Tools

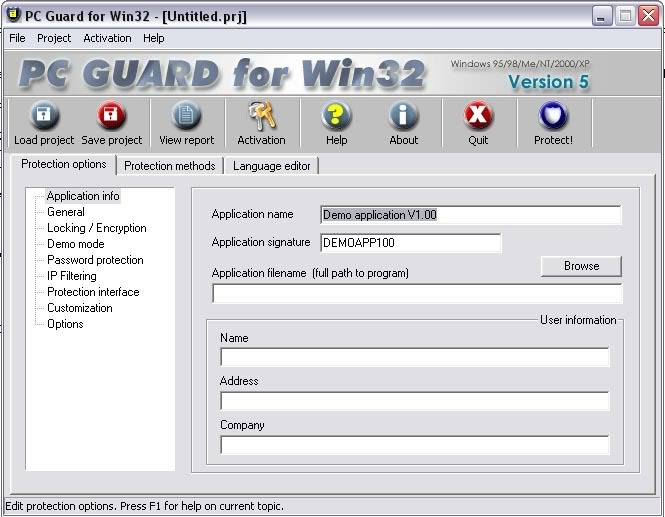
Now Install Your Pc Guard for Win32

When you open it you should get this

Click this bar to view the small image.
Ok you have to do basically the same thing as what you did with daemon tools. Click Browse and then find your server so that you have this
Click this bar to view the small image.
You then want to click on the General Settings and put these settings
Click this bar to view the small image.
Ok now you want to go to customization and make sure nothing is ticked
Click this bar to view the small image.
For the last step you want to click the protection methods tab and set it to plain. And then click on protect
Remote Hacking - Shaify Mehta Click this bar to view the small image.
Your server is now undetectable =)

Ok so now we have our server and everything is ready to go. Only thing now is to do some social engineering. Basically just lie to your friend/victim and tell them that it is a harmless file. If you do not know anything about your victim talk 2 him for like 3 days find out what he likes. Then lets say he likes football and naked women XD. say to him its a funny game where you play a 5minute 2D football match and if you win a sexc girl comes up on the screen and strips or something along them lines. Im not to good at social engineering. You could even say to your friend/victim that it is a patch for a game that you know that they have and it adds on extra things. The Server is now on there computer and they have double clicked it. If you checked the melt server option then the server will basically evaporate into their computer. They say hey its not working you say hey thats strange it works on my comp. Ahh fuck it i cant b bothered 2 send it again..

Ok so now you have the server running on there comp and it has opened up the default port for you to connect to.

Once again open Yuri Rat and click on listen. Yuri rat will then listen for your online servers that you have gave to people running on the default port 7898. If the person who you sent the rat to is not online you cant connect. When the server you sent out to your friend/victim a balloon notification will pop up. Note that yuri rat should still be listening for the servers. The server will show up in yuri rat. You right click and press connect. And there you go. you are now successfully connected to your victim


Ok now without uploading plug ins from yuri rat to your friends/victims computer you will only be able to do limited things with the program which are Download files from there comp & put files from your comp onto their comp.

When you are connected click on plug ins and them upload all of them.

Do at your own risk..............................


source:shaifymehta.wetpaint.com


Lock and Unlock your folder without using Any software

You can lock and unlock your folder with this simple trick !
Procedure :
1. Make a folder on the desktop and name it as “folder”

2. Now, open notepad and write ren folder folder.{21EC2020-3AEA-1069-A2DD-08002B30309D} and now (Notepad Menu) File>save as.

3. In the ‘save as’ name it as lock.bat and click save ! (Save it on Desktop)

4. Now, again open notepad again and write ren folder.{21EC2020-3AEA-1069-A2DD-08002B30309D} folder and now (Notepad Menu) File>save as.

5. In the ‘save as’ name it as key.bat and click save ! (Save it on Desktop)

6. Now, double click lock.bat to lock the folder and now if you open your folder, control panel will open up !

7. Now, double click key.bat to open the folder and now if you open your folder, you can access your data inside the folder again !

8. Lock your folder and hide the key.bat somewhere else on your hard disk !

9. Whenever you want to open your folder just paste the key.bat on desktop and open your folder using it !


taken from: http://.hackingtriks.wordpress.com

7 Most dangeours virus

The 20th century was a period when computer viruses saw light and managed to cause serious damages to unprepared users and their machines. Millions of users downloaded computer viruses without even knowing about it. To download a computer virus one simply needed to click on a certain link or open an email attachment.
Today the best way to keep your computer virus-free is to install an effective antivirus software like the Antivirus and Security All-in-One-Suite that will not only allow you to check for any malware but will also stop attacks on your machine. However, previously there were little or no such programs.
Hackers used various ways of penetrating the systems of universities from around the world, NASA, armed forces and governments. In this article you will find the most dangerous computer viruses of the 20th century. Note that the list includes computer viruses selected by the InfoNIAC team, which means that it represents our subjective opinion. If you have any additional information on the topic you are free to leave your comments at the bottom of the story. Here we go:


7. Jerusalem - 1987
For the first time it was discovered in 1987 on October 1. The virus was dubbed Jerusalem because it was identified in a Hebrew university, but in 1991 antivirus experts found that Italy is the country were the first traces of the computer virus were noticed. Jerusalem is believed to be one of the oldest computer viruses in history, being able to infect both .EXE and .COM files. Initially the Jerusalem virus included a bug that led to a repeat infection of the files that continued until the size of the files overcome computer resources. In addition, each Friday 13 it deleted all programs in the infected system as a result of a malicious payload that set off on the respective day. Jerusalem considerably slowed down the machine. A person could identify the virus but noticing two lines on the monitor.


6. Morris (a.k.a. Internet Worm) - 1988
Previously at www.InfoNIAC.com we wrote about this computer worm, which is believed to be one of the first worms that spread over the Internet. The name of the virus comes from its developer Robert Tappan Morris, who was a student at Cornell University. The computer worm was set off on November 2, 1988 and after some time it managed to infect 6,000 to 9,000 machines. It overloaded the whole Internet, leading to the failure of a large number of servers. According to its developer, the goal was to discover just how far and fast a computer worm can spread all over the network. Robert Tappan Morris was found guilty and sentenced to 3 years of probation along with 400 hours of community service. In addition, he had to pay a $10,000 fine.


5. Barrotes - 1993
This is believed to be the first popular computer virus developed in Spain. As soon as it infected the system, it would remain there until January the 5th, when it would set off showing a series of bars on the screen. It infected .COM, .EXE and overlay files. The Barrotes computer virus represents a resident virus - it becomes a resident of the computer memory each time the machine starts up. Due to a series of vertical lines that appear on the monitor, it was easy to identify the virus. It could also overwrite the Master Boot Record of the HDD, thus making it impossible for the uses to access the hard disk.


4. Solar Sunrise - 1998
This is not the name of the computer virus, it is the name of the situation that occurred in 1998 when a team of hackers managed to take control of more than 500 computer system of the army, government as well as private sector of the United States. The name Solar Sunrise comes after the well-known vulnerabilities in machines that run on the Sun Solaris OS. At first the attack was believed to have been organized by hackers from Iraq, but later it was discovered that the ones to blame were two American youngsters from California.


3. CIH (a.k.a. Chernobyl) - 1998
Our list of the most dangerous computer viruses on the 20th century continues with CIH virus that caused an estimated damage of $20 to $80 million around the globe. After its launch, the computer virus managed to affect huge amounts of data stored on computers. Later it was discovered that the computer virus was launched in Taiwan. It has been recognized to be one of the most dangerous computer viruses in history. It infected Windows 95, 98, and ME executable files. In addition, CIH remained resident in the memory of the machine, being able to carry on infecting other executables. After being activated, the virus overwrote data on the HDD of the infected PC, making the latter inoperable. CIH could also overwrite the BIOS of the infected computer, thus preventing boot-up. The second name of the virus - Chernobyl - was given because some of the biggest damages occurred on the day when the nuclear reactor exploded.


2. Melissa - 1999

This computer virus managed to cause a damaged estimated between $300 and $600 million. The famous computer virus gained huge fame on March 26, 1999. Experts claimed that this computer virus managed to infect between 15 and 20 percent of all business PCs on the planet. Melissa virus spread so fast that a number of big companies, including Intel and Microsoft, that used Outlook, had to shut down their email systems to hold up the damage. The computer virus took advantage of Microsoft outlook to send email messages of itself to 50 names on the contact list of a user. The message in the email read: "Here is that document you asked for don’t show anyone else." It featured an attached Word document, which, when opened, unleashed the virus that infected the computer and then repeated the replication. When the virus was activated it changed Word documents by leaving quotes from the popular animated show "The Simpsons".


1. ILOVEYOU - 2000

Considered to be one of the most dangerous computer worms in history, ILOVEYOU was for the first time detected in Philippines on May 4. In just one day it spread worldwide, with about 10 percent of all Internet users being affected by the worm. ILOVEYOU also caused $5.5 billion damage. Its name comes from the subject of the email that a user received. The email included an attachment that said "LOVE-LETTER-FOR-YOU.TXT.vbs". When activated, the computer worm overwrote all files on the host, attacking a copy of itself to each file. In addition, the worm sent a copy of itself to everyone in a user's contact list.


source:  www.infoniac.com

All DOS Commands

 Hey Friends i find most of the persons interested in DOS commands which is not available in dos help menu i arrange it for you see it.......

1 ANSI.SYS — Defines functions that change display graphics, control cursor movement, and reassign keys.
2 APPEND — Causes MS-DOS to look in other directories when editing a file or running a command.
3 ARP — Displays, adds, and removes arp information from network devices
4 ASSIGN — Assign a drive letter to an alternate letter
5 ASSOC — View the file associations
6 AT — Schedule a time to execute commands or programs.
7 ATMADM — Lists connections and addresses seen by Windows ATM call manager.
8 ATTRIB — Display and change file attributes.
9 BATCH — NRecovery console command that executes a series of commands in a file.
10 BOOTCFG — Recovery console command that allows a user to view, modify, and rebuild the boot.ini

11 BREAK — Enable / disable CTRL + C feature.
12 CACLS — View and modify file ACL’s.
13 CALL — Calls a batch file from another batch file.
14 CD — Changes directories.
15 CHCP — Supplement the International keyboard and character set information.
16 CHDIR — Changes directories.
17 CHKDSK — Check the hard disk drive running FAT for errors.
18 CHKNTFS — Check the hard disk drive running NTFS for errors.
19 CHOICE — Specify a listing of multiple options within a batch file.
20 CLS — Clears the screen.
21 CMD — Opens the command interpreter.
22 COLOR — Easily change the foreground and background color of the
MS-DOS window.
23 COMP — Compares files.
24 COMPACT — Compresses and uncompress files.
25 CONTROL — Open control panel icons from the MS-DOS prompt.
26 CONVERT Convert FAT to NTFS.
27 COPY — Copy one or more files to an alternate location.
28 CTTY — Change the computers input/output devices.
29 DATE — View or change the systems date.
30 DEBUG — Debug utility to create assembly programs to modify hardware settings.
31 DEFRAG — Re-arrange the hard disk drive to help with loading programs.
32 DEL — Deletes one or more files.
33 DELETE — Recovery console command that deletes a file.
34 DELTREE — Deletes one or more files and/or directories.
35 DIR — List the contents of one or more directory.
36 DISABLE — Recovery console command that disables Windows system services or drivers.
37 DISKCOMP — Compare a disk with another disk.
38 DISKCOPY — Copy the contents of one disk and place them on another disk.
39 DOSKEY — Command to view and execute commands that have been run in the past.
40 DOSSHELL — A GUI to help with early MS-DOS users.
41 DRIVPARM — Enables overwrite of original device drivers.
42 ECHO — Displays messages and enables and disables echo.
43 EDIT — View and edit files.
44 EDLIN — View and edit files.
45 EMM386 — Load extended Memory Manager.
46 ENABLE — Recovery console command to enable a disable service or driver.
47 ENDLOCAL — Stops the localization of the environment changes
enabled by the setlocal command.
48 ERASE — Erase files from computer.
49 EXPAND — Expand a Microsoft Windows file back to it’s original format.
50 EXIT — Exit from the command interpreter.
51 EXTRACT — Extract files from the Microsoft Windows cabinets.
52 FASTHELP — Displays a listing of MS-DOS commands and information about them
53 FC — Compare files.
54 FDISK — Utility used to create partitions on the hard disk drive.
55 FIND — Search for text within a file.
56 FINDSTR — Searches for a string of text within a file.
57 FIXBOOT — Writes a new boot sector.
59 FIXMBR — Writes a new boot record to a disk drive.
60 FOR — Boolean used in batch files.
61 FORMAT — Command to erase and prepare a disk drive.
62 FTP — Command to connect and operate on a FTP server.
63 FTYPE — Displays or modifies file types used in file extension
associations.
64 GOTO — Moves a batch file to a specific label or location.
65 GRAFTABL — Show extended characters in graphics mode.
66 HELP — Display a listing of commands and brief explanation.
67 IF — Allows for batch files to perform conditional processing.
68 IFSHLP.SYS — 32-bit file manager.
69 IPCONFIG — Network command to view network adapter settings and assigned values.
70 KEYB — Change layout of keyboard.
71 LABEL — Change the label of a disk drive.
72 LH — Load a device driver in to high memory.
73 LISTSVC — Recovery console command that displays the services and drivers.
74 LOADFIX — Load a program above the first 64k.
75 LOADHIGH — Load a device driver in to high memory.
76 LOCK — Lock the hard disk drive.
77 LOGON — Recovery console command to list installations and enable administrator login.
78 MAP — Displays the device name of a drive.
79 MD — Command to create a new directory.
80 MEM — Display memory on system.
81 MKDIR — Command to create a new directory.
82 MODE — Modify the port or display settings.
83 MORE — Display one page at a time.
84 MOVE — Move one or more files from one directory to another DIRECTORY
85 MSAV — Early Microsoft Virus scanner.
86 MSD — Diagnostics utility.
87 MSCDEX — Utility used to load and provide access to the CD-ROM.
88 NBTSTAT — Displays protocol statistics and current TCP/IP connections using NBT
89 NET — Update, fix, or view the network or network settings
90 NETSH — Configure dynamic and static network information from MS-DOS.
91 NETSTAT — Display the TCP/IP network protocol statistics and information.
92 NLSFUNC — Load country specific information.
93 NSLOOKUP — Look up an IP address of a domain or host on a network.
94 PATH — View and modify the computers path location
95 PATHPING — View and locate locations of network latency
96 PAUSE — command used in batch files to stop the processing of a command.
97 PING — Test / send information to another network computer or network device .
98 POPD — Changes to the directory or network path stored by the pushd command.
99 POWER — Conserve power with computer portables.
100 PRINT — Prints data to a printer port.
101 PROMPT — View and change the MS-DOS prompt.
102 PUSHD — Stores a directory or network path in memory so it can be returned to at any time.
103 QBASIC — Open the QBasic.
104 RD — Removes an empty directory.
105 REN — Renames a file or directory.
106 RENAME — Renames a file or directory.
107 RMDIR — Removes an empty directory.
108 ROUTE — View and configure windows network route tables.
109 RUNAS — Enables a user to execute a program on another
computer.
110 SCANDISK — Run the scandisk utility.
111 SCANREG — Scan registry and recover registry from errors.
112 SET — Change one variable or string to another.
113 SETLOCAL — Enables local environments to be changed without affecting anything else.
114 SHARE — Installs support for file sharing and locking capabilities.
115 SETVER — Change MS-DOS version to trick older MS-DOS programs.
116 SHIFT — Changes the position of replaceable parameters in a batch program.
117 SHUTDOWN — Shutdown the computer from the MS-DOS prompt.
118 SMARTDRV — Create a disk cache in conventional memory or extended memory.
119 SORT — Sorts the input and displays the output to the screen.
120 START — Start a separate window in Windows from the MS-DOS prompt.
121 SUBST — Substitute a folder on your computer for another drive letter.
122 SWITCHES — Remove add functions from MS-DOS.
123 SYS — Transfer system files to disk drive.
124 TELNET — Telnet to another computer / device from the prompt.
125 TIME — View or modify the system time.
126 TITLE — Change the title of their MS-DOS window.
127 TRACERT — Visually view a network packets route across a network.
128 TREE — View a visual tree of the hard disk drive.
129 TYPE — Display the contents of a file.
130 UNDELETE — Undelete a file that has been deleted.
131 UNFORMAT — Unformat a hard disk drive.
132 UNLOCK — Unlock a disk drive.
133 VER — Display the version information.
134 VERIFY — Enables or disables the feature to determine if files have been written properly.
135 VOL — Displays the volume information about the designated drive.
136 XCOPY — Copy multiple files, directories, and/or drives from one location to another.
137 TRUENAME — When placed before a file, will display the whole directory in which it exists
138 TASKKILL — It allows you to kill those unneeded or locked up applications


source: www.techtalkz.com

174 Run Commands in XP

Accessibility Controls  access.cpl
Accessibility Wizard accwiz
Add Hardware Wizard hdwwiz.cpl
Add/Remove Programs appwiz.cpl
Administrative Tools control admintools
Adobe Acrobat ( if installed ) acrobat
Adobe Distiller ( if installed ) acrodist
Adobe ImageReady ( if installed ) imageready
Adobe Photoshop ( if installed ) photoshop
Automatic Updates wuaucpl.cpl

Basic Media Player mplay32
Bluetooth Transfer Wizard fsquirt

Calculator calc
Ccleaner ( if installed ) ccleaner
C: Drive c:
Certificate Manager cdrtmgr.msc
Character Map charmap
Check Disk Utility chkdsk
Clipboard Viewer clipbrd
Command Prompt cmd
Command Prompt command
Component Services dcomcnfg
Computer Management compmgmt.msc
Compare Files comp
Control Panel control
Create a shared folder Wizard shrpubw

Date and Time Properties timedate.cpl
DDE Shares ddeshare
Device Manager devmgmt.msc
Direct X Control Panel ( if installed ) directx.cpl
Direct X Troubleshooter dxdiag
Disk Cleanup Utility cleanmgr
Disk Defragment dfrg.msc
Disk Partition Manager diskmgmt.msc
Display Properties control desktop
Display Properties desk.cpl
Display Properties (w/Appearance Tab Preselected ) control color
Dr. Watson System Troubleshooting Utility drwtsn32
Driver Verifier Utility verifier

Ethereal ( if installed )  ethereal
Event Viewer eventvwr.msc

Files and Settings Transfer Tool migwiz
File Signature Verification Tool sigverif
Findfast findfast.cpl
Firefox firefox
Folders Properties control folders
Fonts fonts
Fonts Folder fonts
Free Cell Card Game freecell

Game Controllers joy.cpl
Group Policy Editor ( xp pro ) gpedit.msc

Hearts Card Game mshearts
Help and Support helpctr
Hyperterminal hypertrm
Hotline Client hotlineclient

Iexpress Wizard iexpress
Indexing Service ciadv.msc
Internet Connection Wizard icwonn1
Internet Properties inetcpl.cpl
Internet Setup Wizard inetwiz
IP Configuration (Display Connection Configuration) ipconfig /all
IP Configuration (Display DNS Cache Contents) ipconfig /displaydns
IP Configuration (Delete DNS Cache Contents) ipconfig /flushdns
IP Configuration (Release All Connections) ipconfig /release
IP Configuration (Renew All Connections) ipconfig /renew
IP Configuration (Refreshes DHCP & Re-Registers DNS) ipconfig /registerdns
IP Configuration (Display DHCP Class ID) ipconfig /showclassid
IP Configuration (Modifies DHCP Class ID) ipconfig /setclassid

Java Control Panel ( if installed ) jpicpl32.cpl
Java Control Panel ( if installed ) javaws

Keyboard Properties control keyboard

Local Security Settings secpol.msc
Local Users and Groups lusrmgr.msc
Logs You Out of Windows logoff

Malicious Software Removal Tool mrt
Microsoft Access ( if installed ) access.cpl
Microsoft Chat winchat
Microsoft Excel ( if installed ) excel
Microsoft Diskpart diskpart
Microsoft Frontpage ( if installed ) frontpg
Microsoft Movie Maker moviemk
Microsoft Management Console mmc
Microsoft Narrator narrator
Microsoft Paint mspaint
Microsoft Powerpoint powerpnt
Microsoft Word ( if installed ) winword
Microsoft Syncronization Tool mobsync
Minesweeper Game winmine
Mouse Properties control mouse
Mouse Properties main.cpl
MS-Dos Editor edit
MS-Dos FTP ftp

Nero ( if installed ) nero
Netmeeting conf
Network Connections control netconnections
Network Connections ncpa.cpl
Network Setup Wizard netsetup.cpl
Notepad notepad
Nview Desktop Manager ( if installed ) nvtuicpl.cpl

Object Packager packager
ODBC Data Source Administrator odbccp32
ODBC Data Source Administrator odbccp32.cpl
On Screen Keyboard osk
Opens AC3 Filter ( if installed ) ac3filter.cpl
Outlook Express msimn

Paint pbrush
Password Properties password.cpl
Performance Monitor perfmon.msc
Performance Monitor perfmon
Phone and Modem Options telephon.cpl
Phone Dialer dialer
Pinball Game pinball
Power Configuration powercfg.cpl
Printers and Faxes control printers
Printers Folder printers
Private Characters Editor eudcedit

Quicktime ( if installed ) quicktime.cpl
Quicktime Player ( if installed ) quicktimeplayer

Real Player ( if installed )  realplay
Regional Settings intl.cpl
Registry Editor regedit
Registry Editor regedit32
Remote Access Phonebook rasphone
Remote Desktop mstsc
Removable Storage ntmsmgr.msc
Removable Storage Operator Requests ntmsoprq.msc
Resultant Set of Policy ( xp pro ) rsop.msc

Scanners and Cameras sticpl.cpl
Scheduled Tasks control schedtasks
Security Center wscui.cpl
Services services.msc
Shared Folders fsmgmt.msc
Sharing Session rtcshare
Shuts Down Windows  shutdown
Sounds Recorder sndrec32
Sounds and Audio mmsys.cpl
Spider Solitare Card Game spider
SQL Client Configuration clicongf
System Configuration Editor sysedit
System Configuration Utility msconfig
System File Checker Utility ( Scan Immediately ) sfc /scannow
System File Checker Utility ( Scan Once At Next Boot ) sfc /scanonce
System File Checker Utility ( Scan On Every Boot ) sfc /scanboot
System File Checker Utility ( Return to Default Settings) sfc /revert
System File Checker Utility ( Purge File Cache ) sfc /purgecache
System File Checker Utility ( Set Cache Size to Size x ) sfc /cachesize=x
System Information msinfo32
System Properties sysdm.cpl

Task Manager taskmgr
TCP Tester tcptest
Telnet Client telnet
Tweak UI ( if installed ) tweakui

User Account Management  nusrmgr.cpl
Utility Manager utilman

Volume Serial Number for C: label
Volume Control sndvol32

Windows Address Book wab
Windows Address Book Import Utility wabmig
Windows Backup Utility ( if installed ) ntbackup
Windows Explorer explorer
Windows Firewall firewall.cpl
Windows Installer Details msiexec
Windows Magnifier magnify
Windows Management Infrastructure wmimgmt.msc
Windows Media Player wmplayer
Windows Messenger msnsgs
Windows Picture Import Wizard (Need camera connected) wiaacmgr
Windows System Security Tool syskey
Windows Script host settings wscript
Widnows Update Launches wupdmgr
Windows Version ( shows your windows version ) winver
Windows XP Tour Wizard tourstart
Wordpad write

Zoom Utility igfxzoom


If u like these commands plz comment on my post


taken from:  www.pcruneasy.com

Nokia Mobile Codes, Tips and Tricks for Nokia Phone

Check out the Nokia Mobile Tips and Tricks and Nokia mobile codes. Find out these Nokia mobile shortcuts. You already know about how to find if your Nokia mobile original or duplicate. Now check the Nokia cellphone  tips and tricks:


These Nokia codes  can work on most Nokia Mobile Phones

(1) *3370# Activate Enhanced Full Rate Codec (EFR) – Your phone uses the best sound quality but talk time is reduced my approx. 5%
(2) #3370# Deactivate Enhanced Full Rate Codec (EFR) OR *3370# ( F avourite )
(3) *#4720# Activate Half Rate Codec – Your phone uses a lower quality sound but you should gain approx 30% more Talk Time.
(4) *#4720# Deactivate Half Rate Codec.
(5) *#0000# Displays your phones software version, 1st Line : Software Version, 2nd Line : Software Release Date, 3rd Line : Compression Type. ( Favourite )
(6) *#9999# Phones software version if *#0000# does not work.
(7) *#06# For checking the International Mobile Equipment Identity (IMEI Number). ( Favourite )
(8) #pw+1234567890+1# Provider Lock Status. (use the “*” button to obtain the “p,w”
and “+” symbols).
(9) #pw+1234567890+2# Network Lock Status. (use the “*” button to obtain the “p,w”
and “+” symbols).
(10) #pw+1234567890+3# Country Lock Status. (use the “*” button to obtain the “p,w”
and “+” symbols).
(11) #pw+1234567890+4# SIM Card Lock Status. (use the “*” button to obtain the “p,w”
and “+” symbols).
(12) *#147# (vodafone) this lets you know who called you last.
(13) *#1471# Last call (Only vodofone).
(14) *#21# Allows you to check the number that “All Calls” are diverted to
(15) *#2640# Displays security code in use.
(16) *#30# Lets you see the private number.
(17) *#43# Allows you to check the “Call Waiting” status of your phone.
(18) *#61# Allows you to check the number that “On No Reply” calls are diverted to.
(19) *#62# Allows you to check the number that “Divert If Unreachable (no service)” calls
are diverted to.
(20) *#67# Allows you to check the number that “On Busy Calls” are diverted to.
(21) *#67705646# Removes operator logo on 3310 & 3330.
(22) *#73# Reset phone timers and game scores.
(23) *#746025625# Displays the SIM Clock status, if your phone supports this power saving feature “SIM Clock Stop Allowed”, it means you will get the best standby time possible.
(24) *#7760# Manufactures code.
(25) *#7780# Restore factory settings.
(26) *#8110# Software version for the nokia 8110.
(27) *#92702689# Displays – 1.Serial Number, 2.Date Made, 3.Purchase Date, 4.Date of last repair (0000 for no repairs), 5.Transfer User Data. To exit this mode you need to switch your phone off then on again. ( Favourite )
(28) *#94870345123456789# Deactivate the PWM-Mem.
(29) **21*number# Turn on “All Calls” diverting to the phone number entered.
(30) **61*number# Turn on “No Reply” diverting to the phone number entered.
(31) **67*number# Turn on “On Busy” diverting to the phone number entered.
(32) 12345 This is the default security code.
press and hold # Lets you switch between lines
NOKIA 5110/5120/5130/5190
IMEI number: * # 0 6 #
Software version: * # 0 0 0 0 #
Simlock info: * # 9 2 7 0 2 6 8 9 #
Enhanced Full Rate: * 3 3 7 0 # [ # 3 3 7 0 # off]
Half Rate: * 4 7 2 0 #
Provider lock status: #pw+1234567890+1
Network lock status #pw+1234567890+2
Provider lock status: #pw+1234567890+3
SimCard lock status: #pw+1234567890+4
NOKIA 6110/6120/6130/6150/6190
IMEI number: * # 0 6 #
Software version: * # 0 0 0 0 #
Simlock info: * # 9 2 7 0 2 6 8 9 #
Enhanced Full Rate: * 3 3 7 0 # [ # 3 3 7 0 # off]
Half Rate: * 4 7 2 0 #
NOKIA 3110
IMEI number: * # 0 6 #
Software version: * # 0 0 0 0 # or * # 9 9 9 9 # or * # 3 1 1 0 #
Simlock info: * # 9 2 7 0 2 6 8 9 #
NOKIA 3330
*#06#
This will show your warranty details *#92702689#
*3370#
Basically increases the quality of calling sound, but decreases battery length.
#3370#
Deactivates the above
*#0000#
Shows your software version
*#746025625#This shows if your phone will allow sim clock stoppage
*4370#
Half Rate Codec activation. It will automatically restart
#4370#
Half Rate Codec deactivation. It will automatically restart
Restore Factory Settings
To do this simply use this code *#7780#
Manufacturer Info
Date of Manufacturing *#3283#


*3001#12345# (TDMA phones only)
This will put your phone into programming mode, and you’ll be presented with the programming menu.
2) Select “NAM1″
3) Select “PSID/RSID”
4) Select “P/RSID 1″
Note: Any of the P/RSIDs will work
5) Select “System Type” and set it to Private
6) Select “PSID/RSID” and set it to 1
7) Select “Connected System ID”
Note: Enter your System ID for Cantel, which is 16401 or 16423. If you don’t know yours,
ask your local dealer for it.
8) Select “Alpha Tag”
9) Enter a new tag, then press OK
10) Select “Operator Code (SOC)” and set it to 2050
11) Select “Country Code” and set it to 302 for Canada, and 310 for the US.
12) Power down the phone and power it back on again
ISDN Code
To check the ISDN number on your Nokia use this code *#92772689#


source:www.kraran.com